
Baroul Calarasi
Tablou avocati
Diverse
- Consiliul Baroului Călărași, convoacă la data de 30.05.2025, ora 13:00, în Călărași, str. București, nr. 106, județul Călărași, Adunarea Generală Electivă pentru continuarea alegerilor cu desfășurarea turului al treilea de scrutin pentru alegerea Decanului, având în vedere incidența situației de balotaj între primii doi candidați.


- Hotărârea 76- privind organizarea examenului de primire în profesie/ septembrie 2024- 13 iunie 2024;
- Hotărârea 75- privind modificare Regulament Cadru pentru organizarea examenului de primire în profesia de avocat și admitere în cadrul I.N.P.P.A.- 13 iunie 2024;
- Comunicat- privind acțiunea de protest ”O zi fără avocați- ziua în care justiția nu există!”, organizată pe data de 04.10.2023 de Baroul Călărași;
- Decizia nr. 9-a Comisiei Permanente a UNBR nr. 09 din 31 august 2023 privind actualizarea taxelor pentru activitatea de formare inițială la INPPA, ținând cont de indicele prețurilor de consum în perioada august 2012 – iunie 2023;
- Comunicat privind intenția Guvernului României de a aduce modificări codului fiscal, în sensul obligării avocaților la plata cotei CASS în sistem real, neplafonat/ 14.08;
- Hotărârea nr. 352- privind organizarea examenului de primire în profesie- sesiunea septembrie 2023/ 8.06;
- Hotărârea nr. 351- pentru modificarea REGULAMENTULUI - CADRU privind organizarea examenului de primire în profesia de avocat și admitere în cadrul Institutului Național pentru Pregătirea și Perfecționarea Avocaților – I.N.P.P.A. (în vederea dobândirii titlului profesional de avocat stagiar) și de primire în profesia de avocat a persoanelor care au absolvit examenul de definitivat în alte profesii juridice/ 8.06;
- Decizia nr. 461 din 13.01.2023 a U.N.B.R.- privind organizarea examenului de primire în profesie- sesiunea aprilie 2023;
- Anexa la decizia 461 din 13.01.2023/ tematica pentru examen.
- Hotărârea nr. 5- din 10.01.2023.
-
„FII AVOCAT ÎN ȘCOALA TA!"- Uniunea Națională a Barourilor din România invită colegii avocați să se înscrie în Proiectul „Fii avocat în școala ta!” în perioada 09.02.2022 – 20.02.2022. Înscrierea se va face prin e-mail, la adresa- office@baroulcalarasi.ro. Se pot înscrie avocații care îndeplinesc următoarele condiții minimale:
- Să fie avocat definitiv;
- Să se bucure de o bună reputație socio-profesională;
- Să nu aibă aplicate sancțiuni disciplinare în ultimii 5 ani;
- Să nu înregistreze restanțe la plata taxelor și contribuțiilor profesionale.
Selecția echipei inițiale de proiect se va realiza de către Consiliul Baroului Călărași până la data de 28.02.2022. Proiectul se fundamentează pe participarea voluntară și neremunerată a avocaților selectați. Prima etapă se va derula în perioada 15.03 – 15.06.2022 și constă în susținerea de către avocați a unor tematici sub forma a 5 module de câte o oră desfășurate în cadrul programei de dirigenție (sau a altor materii, în funcție de protocol), pentru întreaga perioadă. Precizăm faptul că programul va fi variabil, în funcție de orarul școlar, raportat la clasele/ unitățile școlare partenere – program de dimineață sau de după-amiază, iar tematicile vor fi abordate unitar, având la bază materialele puse la dispoziție de UNBR.”
vezi criterii de selecție echipă
vezi fișă de atribuții ale coordonatorului de proiect
- Anunt- Institutul Național pentru Pregătirea și Perfecționarea Avocaților (I.N.P.P.A.) anunță organizarea a cinci cursuri extracurriculare, concepute în sistem interactiv, destinate avocaților (definitivi și stagiari);
- Anunț- Uniunea Națională a Barourilor din România anunță organizarea examenului de primire în profesia de avocat (pentru dobândirea titlului profesional de avocat stagiar) și de primire în profesia de avocat a persoanelor care au absolvit examenul de definitivat în alte profesii juridice, sesiunea septembrie 2021;
- Hotărârea nr. 148- privind organizarea examenului de primire în profesie, sesiunea septembrie 2021/ 14- 15.05.2021- descarcă regulament examen;
- Hotărârea nr. 1- Consiliul de Administrație al Casei de Asigurări a Avocaților din România Filiala Călărași, reunit în şedinţa din 25.01.2021, convoacă Adunarea Generală Ordinară a Casei de Asigurări a Avocaților din România din anul 2021 și Adunarea Generală Electivă de alegere a organelor de conducere ale Casei de Asigurări a Avocaților din România în ziua de sâmbătă, 27 martie 2021, orele 12.00;
- Comunicat U.N.B.R.- ”Profesia de avocat a fost inclusă printre domeniile cheie de activitate vizate în etapa a doua de vaccinare”;
- Comunicat Baroul Calarasi;
- Comunicat U.N.B.R.;
- Anunt examen de primire in profesia de avocat- sesiunea septembrie 2020;
- Anunt- Adunare Generala Ordinara privind alegerea Decanului Baroului, dar si a delegatului la congresul avocatilor 2020- 23.07;
- Comunicat- al Uniunii Naționale a Barourilor din România (UNBR) prin care solicită autorităților competente ca orice măsuri de sprijin va lua față de contribuabili pentru a reduce efectele economice negative ale pandemiei cu coronavirus să fie aplicabile și avocaților și tuturor profesioniștilor independenți;
- Anunt- Adunare Generala Ordinara si Adunarea Generală Electivă a Baroului Călărași din 21 martie 2020- descarca regulament alegeri;
- Anunt- privind Legea nr. 129 din 11 iulie 2019 pentru prevenirea și combaterea spălării banilor și finanțării terorismului.
- Anunt examen – Uniunea Națională a Barourilor din România anunţă organizarea examenului de primire în profesia de avocat (pentru dobândirea titlului profesional de avocat stagiar) şi de primire în profesia de avocat a persoanelor care au absolvit examenul de definitivat în alte profesii juridice, sesiunea august 2019.
- Hotarirea 462- pentru republicarea în formă consolidată a Regulamentului - cadru privind organizarea examenului de primire în profesia de avocat şi admitere în cadrul Institutului Naţional pentru Pregătirea şi Perfecţionarea Avocaţilor (în vederea dobândirii titlului profesional de avocat stagiar) şi de primire în profesia de avocat a persoanelor care au absolvit examenul de definitivat în alte profesii juridice;
- Hotarirea 463- privind organizarea examenului de primire în profesie -sesiunea august 2019;
- Hotarirea 464- privind taxa de inscriere la examen.
IMPORTANT!
- Se organizează examenul de primire în profesia de avocat şi admitere în cadrul Institutului Naţional pentru Pregătirea şi Perfecţionarea Avocaţilor (în vederea dobândirii titlului profesional de avocat stagiar) şi de primire în profesia de avocat a persoanelor care au absolvit examenul de definitivat în alte profesii juridice în sesiunea martie 2019, la data de 03 martie 2019.
- Anunt de participare la seminarul, “Accesul efectiv la justitie in cazul persoanelor apartinand grupurilor vulnerabile, cu accent asupra femeilor rome”/ descarca agenda seminar;
- UNBR a fost solicitată de Consiliul Barourilor Europene (CCBE) să acorde sprijin în vederea realizării unui sondaj de opinie în rândul avocaților;
- Anunt- privind alaturarea avocatilor la protestul din perioada 11- 24.02.2019.
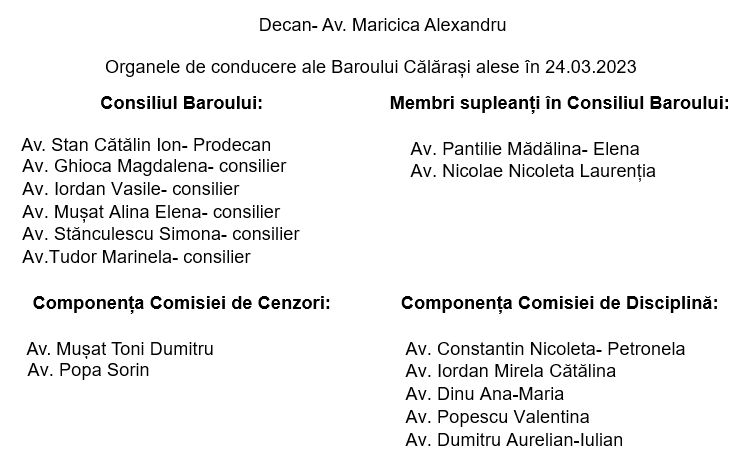
DECAN - Av. Alexandru Maricica
PRODECAN - Av. Stan Cătălin Ion
|
Consiliu:
|
Comisia de cenzori:
|
|
|
Comisia de disciplina:
|
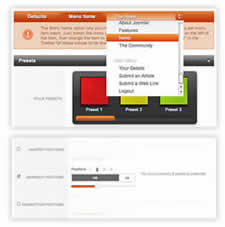
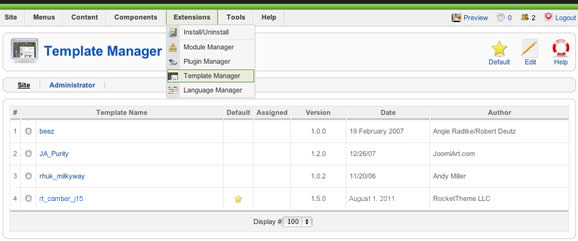
Access the Style Control settings from Admin → Extensions → Template Manager → rt_camber_j15 → Settings.
Simple configure the options, then save and Gantry will automatically load the modified preset to your site.
Color Chooser Settings
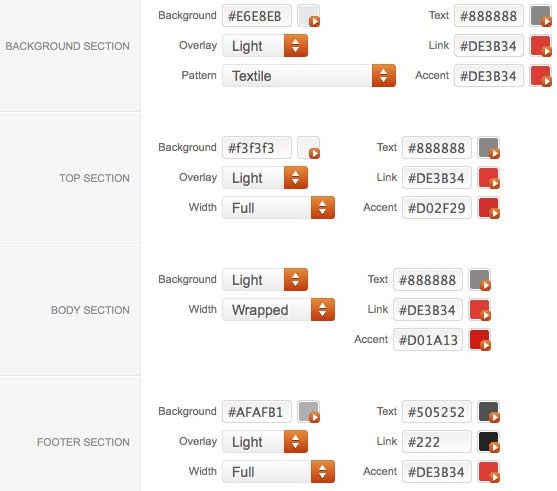
A Color Chooser template uses CSS color values, combined with transparent overlay images, to determine its color and style. Therefore, you can change the entire color scheme via the Gantry Administrator. The available options are outlined below:
Other Style Settings
Assigning a Style to a Specific Page
With Gantry, the ability to assign a certain style to an individual page has never been easier and/or more efficient. Just follow these simple steps:
Gantry Framework: Per Menu Item ControlsRunning sneakersArchives des SneakersGantry sets the dimensions of the logo, so CSS modification is unnecessary.
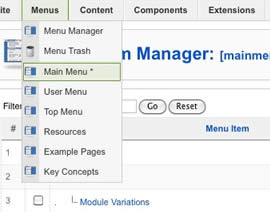
Step 1 - Open the File
Step 2 - Text/Slogan/Icon Editing
![]()
![]()
![]()
Step 3 - Slice Modification
Step 4 - Export
Step 5 - Multiple Frames/States
![]()
![]()
Please ensure you are using the latest version of RokNavMenu, available here.
Configuration
Go to Extensions → Template Manager → rt_camber_j15 → Menu Control → Set Menu Type, to find all the parameters for Fusion Menu and Splitmenu, such as transitions, duration and sublevel position.
Descriptions of each template parameter can be seen when you mouseover the label of each option.
Fusion with MegaMenu
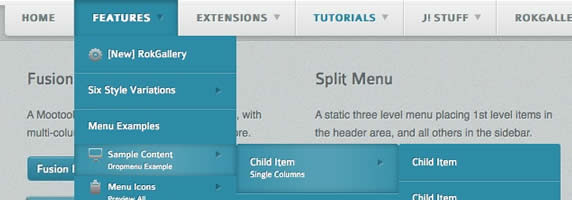
Fusion Menu is a menu theme of the RokNavMenu extension, the addon that drives all RocketTheme template menus. It is primarily a javascript enhanced CSS dropdown menu, that combines standard suckerfish type functionality with animations, transitions and other advanced effects powered by Mootools.
- 1/2/3/4 Column Modes
- Custom Column Widths
- Custom Menu Width
- Menu Item Grouping
- Item Distribution Controls
- Animation Controls
- Transition Controls
- Duration/Delay Controls
- Opacity Controls
- Per Item Styling
- Inline Modules
- Inline Positions
- Menu Item Subtext
- Menu Item Icons
All Menu Items can be edited from Admin → Menu → Menu Name → Menu Item.
Basic Fusion Parameters
Advanced Fusion Parameters: Columns
Menu Columns
Columns of Child Items allows you to determine how many columns the Fusion dropdowns are presented in. You can have anywhere between a single dropdown to a four column dropdown.
Item Distribution
Item Distribution allows you to control how the menu items are ordered in the dropdowns:
NOTE: If your Columns of Child Items setting is configured to be 2 or more columns, you will need to manually set the column widths and distribution, as outlined below. The default is 180px which is too small for multiple columns.
Drop-Down Width (px)
Drop-Down Width (px) determines the total width of the dropdown, regardless of how many columns are shown. This option is to be used in conjunction with Column Widths (px)
Column Widths (px)
Column Widths (px) determines the width of each Column. Separate each width by a comma. The final column's width is determined automatically. This option is to be used in conjunction with Drop-Down Width (px)
Below are some example configurations:
Advanced Fusion Parameters: Groupings
What is Grouping?
Group Child Items changes the behaviour of child items in the dropdown menus, instead of creating a dropdown for the immediate sublevel, this option places them inline. See below for an illustrated example of the differences:
Configuration
NOTE: Grouping cannot be applied to root items, only child items.
Set Group Child Items to Yes to activate the mode. The sublevels well then appear below the parent menu item in a categorical type structure.
Advanced Fusion Parameters: Modules
Fusion is now capable of loading individual modules or entire module positions inside its dropdowns.
Splitmenu
A static menu system that displays 1st and 2nd level items in the main horizontal menu and further children in the Sidebar.
Code Modification: Remove the Menu in the Title
Open /templates/rt_camber_j15/html/modules.php and change:
<?php echo $menu_title_item->name.' '.JText::_('Menu'); ?>
To
<?php echo $menu_title_item->name; ?>
How to create Child / Sublevel menu items
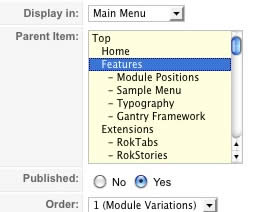
Go to Admin → Menu → A Menu → A Menu Item → Select a Parent Item, and it will appear as a child of it.
Note: The Bundle Template is only necessary if the Gantry Library is not installed at /components/com_gantry.
Template Installation
Step 1 - Installation
Step 2 - Template Default
RocketLauncher Instructions
Note: All sample content images will be replaced with blank versions in the RocketLauncher version.
RocketLauncher is a customized Joomla install, that installs a replica of the demo onto your site - inclusive of sample data, content, extensions, the template and sample images.
We always recommend installing a RocketLauncher first to trial and understand the template more efficiently. It must be installed as new, and not over an existing Joomla install.
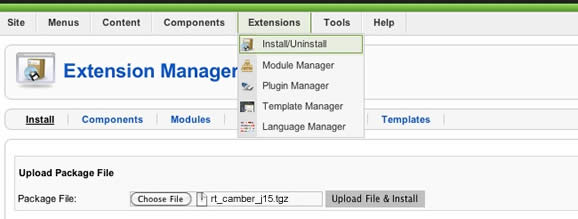
Step 1 - Upload
Note: You can upload all the files via FTP, or use cPanel or SSH to upload the zip and unzip directly onto the server. Enquire with your hosting provider.